Hello and welcome to those of you that have not visited before! And a huge thank you all for attending my classes at the weekends Expo for 2017. It was my first year as a teacher and demonstrator and I had the best time ever! Very tired but it was more than worth the lack of sleep.
I must apologise for the lateness of this post. This was published for each class on the day of the class but for some unexplainable reason they were deleted from my blog. So today I had to retype my notes. But hopefully they were better than the first time around for you. But I trust you will all find the second of these layouts easier than the first as they are somewhat similar. And without further ado you will find below both intructions and photos for the Rambling Rose class........enjoy!
“Gardens are filled with love”
Materials List
Rambling Rose Diecut Ephemera Set
Rambling Rose Collection - Vintage Type (Reverse)
Rambling Rose Collection – Scattered Rambling (Reverse)
Rambling Rose Collection – Butterfly Edge (Title)
Rambling Rose Collection – Welcome Swallows (Swallows and Birdbath)
Rambling Rose Collection – Sue’s Treasures (Small Frames)
Rambling Rose Collection – Subtle Frame (Yellow Roses and Butterflies)
Rambling Rose Collection – Reflections (Large Frames)
Rambling Rose Collection - Butterfly Medley
Rambling Rose Collection – Framed Roses
Rambling Rose Collection – Framed Panels
Cheesecloth, Rhinestones, Magnolia Flowers coloured with Sugar Plum mix spray.
You will also need black ink, a trimmer, small scissors, a craft knife, sanding block or sandpaper and 3 photos measuring approximately 4.5 x 5cm. These need to fit frames measuring 5.25 x 5.5cm.
Instructions
- Using Vintage Type reverse cut a frame with a 2cm border. Ink the edges of this frame using black ink.
- From Scattered Rambling trim 1cm from top and one side. Ink the edges and adhere to the framework of Vintage Type (above).
- From the remaining piece of Vintage Type cut a rectangle 18cm x 26.5cm. Tear a section from both bottom corners of this rectangle. Please see layout. Ink edges with black ink. Adhere each torn corner to the right top and right bottom as shown in layout. Use the remaining part of this rectangle as the starting point for the matting of your photos. Adhere this at approximately 5.5cm from the top edge and 4cm from the left edge. Cut one more thing from Vintage Type – a 6.5cm x 5.75cm rectangle (this is for the matting of your centre photo. Keep this safe to the side).
- You have now completed your background. Time to work on the framework for your photos. In your kit you will find a cut strip of frames cut from Sue’s Treasures. Cut 3 of these to reveal only the framework. Adhere photos to the back of each frame.
- The next cut strip you will find in your kit is titled “Reflections”. This contains the larger frame which will frame your mounted photos. Cut from this only one frame. Tear it diagonally across at corners and lay frame work around Vintage Type and adhere.
- Also in your kit you will find another cut strip which has your title strip. This needs to be cut into a strip. Ink the edges and mould the title as shown by Tina. Keep in a safe place to one side.
- The Ephemera which you will find loose in your plastic bag for this kit, have been cut accordingly for you. Cut the pink butterfly and the title from this same piece. This title is the title for the second layout of your kit. Cut this and keep it safe for when you get home. The other remaining ephemera are for your photo matting. Each of these have been lightly sanded to take away the glossiness of them. Adhere to layout as shown. Adhere photos to these using the kept rectangle from Vintage Type. You may wish to use 3D foam tape to pop up the centre photo as I have done or you can simply lay it flat. Adhere your pink rhinestones to the sanded ephemera pieces.
- Time to start cutting your fussy pieces. Tina will show you the best way she knows to do this in this class today. Each and every fussy cut piece can be distressed and inked as you wish or you can simply leave them as they are. You can then start layering your fussy cut pieces along with your Magnolia Flowers which have already been coloured for you. Add your title that you cut earlier. Lastly you can add in some distressed pieces of cheesecloth to add a softness to your layout.
- Your layout is now finished. I hope you have enjoyed the Expo and class today. Thank you for joining me.
...................................................................................................................................................................
"Butterfly Wishes"
by Tina Ollett
Materials List
Rambling Rose Diecut Ephemera Set
Rambling Rose
Collection – Wood Panel Roses (Background)
Rambling Rose
Collection – Butterfly Edge (Remainder)
Rambling Rose
Collection – Cornered Roses
Rambling Rose Collection – Framed Roses
Rambling Rose Diecut
Ephemera Set
Rambling Rose 4 x 6
“ Scripts Stamp Set
Liquid Drops 3D
Pearls Buttercup
Glitzin’ Glamour
Crystalina
Instructions
- Take Wood Panel Roses and randomly stamp using Rambling Roses' 4 x 6" Script Stamp with a black ink. Then carefully make slits in the wood paneling in sections on the page using a sharp craft knife. See layout for positioning. Distress and curl these slits. Behind these slits at the end of your layout you can adhere in some leftover yellow pieces to highlight the cut sections of your background.
- Take framed Roses and cut the frames only from this sheet. Layer these frames along with fussy cut elements and torn sections. I have used 4 differing sizes of frames. Some are only half frames that are hidden but are giving the impression there is a full frame. Using fussy cut elements over torn sections will hide imperfections. You will see below in the first photo, the starting point of the layering.
Diagram 2 shows the next step of my layering of the frames.
- The next step to start working is the fussy cutting of elements from remaining papers. I usually work from one corner and work across and down. These have been cut out using fine point scissors and a craft knife on a glass mat. I find the knife glides easier along the glass than a craft mat. But that is just a personal thing.
- Apply Glitzin" Glamour Crystalina to sections of the framework. You can see the colour of it dry in the photo below.
- I have also applied a little of the Crystalina to the bodies of the butterflies and the edges of their wings. To the overall butterfly I wiped over a little of the Buttercup 3D pearls with my fingertip and allowed it to dry before adhering it to my layout.
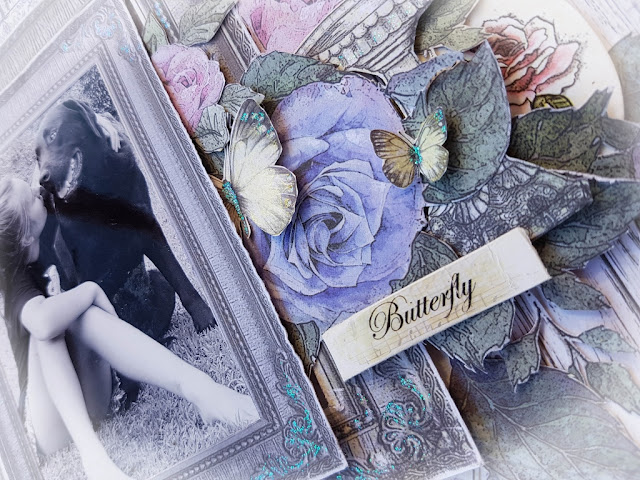
- Below you can see the layering of the fussy cut elements. Remember that the title for this second layout was cut out in class from our ephemera if you can't find it. You will also have to search your ephemera pack for elements added to this layout. The oval rose at the side of this photo is from the pack. As with the first class I sanded ephemera elements to take away the glossiness of the elements, but only if you wish!
- From another angle. The left side of the layout shows more layering of fussy cut elements from the remaining patterned papers left in your kit.
- Some of the elements that were fussy cut at the edge of the left top have been popped up with 3D foam as you can see above and below.
Well that is about all from me. I hope the instructions and photos helped with finishing your first layout and completing the second. However if you still have some questions please don't hesitate to leave your questions in the comment box below. Or alternatively you can message me on facebook. I am always happy to help wherever I can.
Again thank you so much for attending my classes over the weekend. I do hope to see you all in the not so too distant future. Until then take care.
Tina x


No comments:
Post a Comment